Need Help? Call Us 415-423-3313
  • Welcome to The Upholster.com Forum. Please login or sign up.
 
May 07, 2024, 08:19:10 pm

News:

Welcome to our new upholstery forum with an updated theme and improved functionality. We welcome your comments and questions to our forum! Visit our main website, Upholster.com, for our extensive supply of upholstery products, instructional information and videos, and much more.


Show posts

This section allows you to view all posts made by this member. Note that you can only see posts made in areas you currently have access to.

Topics - Peppy

41
The "JUNK" Room / The Big Green Monster
October 09, 2010, 01:01:43 pm
This a good place for this one! Just came back last week. A boomerang boat tarp!

We did this earlier this year. We all got bad vibes from this customer but we'd come off a good stretch de-pickling clients asses, so we thought we were golden.

We gave him this-


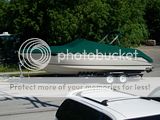
He gave us back a 2 page list of things we did wrong. Fearless Leader says we build a new top from scratch.

I say we head for the hills. One of his complaints was "No evidence of silicone used under snaps." You can bet he'll get big globs this time.
42
The "GREEN" Room! / The Filthy Oar
September 12, 2010, 05:27:11 pm
So my last boat, The Dixie Normas, had to go. We had a baby last year and it was far to small.


Besides, it was finished.


It was a sad day, seeing it leave but it went to a good home. And it made way for the Filthy Oar!


Come, now! Have a little vision! It could be just as pretty as the other one.


First it needs shade, which I kept from the Dixie...


And waterproofing...


Don't worry we'll loose the carpet...


These are wood slats popriveted to strips of plastic with mesh in-between the wood and plastic. I love the look but as crazy as it sounds I may use the old floor reupholstered in seaway no-skid flooring. I was going to make a front seat in this boat like the Queen seat in the Dixie, but after using the boat this summer we really like that the seat swivels. I've been thinking about getting a plate welded to the floor to mount the pedestal on. But also I think the munchkins will get wet with the water splashing up through the mesh....I'm still undecided.


Another thing I'm unsure of is this removable backrest for the middle bench. This was mocked up using old top frames and polytarp. It's too big but it works well. (Thats the bimini tucked in there in it's 'stowed mode')

I've spent most of my time reworking the nose...(not pretty enough by half)


And here it is today! Not finished, more like a work in progress....


Gotta build a place for cup holders and a speakers right?


That bar was going to be support for the Queen seat but is now a holy sh*t handgrip. And thats a anchor cubby.


This was all cobbled together with what I had at hand. For-instance the baby blue aluminum was the front bench taken out of the Dixie. That deadbolt came from a Searay I reupholstered, ect.


...more to follow, like painting, a seat for me, and IDK dingle balls? Whenever the kids happen to nap at the same time and I get another hour to work on it!
43
General Discussion / Attaching to radar arches
August 29, 2010, 05:30:25 pm
I wonder if we could all show some shots of how we attach canvas to arches. Heres what we do currently;


/arch->awning rail->keder welt->zipper->canvas/ with the canvas carrying over the awning rail and snapping to the arch.

we used to do;
/arch->awning rail->keder welt->3"canvas piece->zipper->canvas/ and the canvas stopped at the awning rail and the 3" piece stayed with the arch.

We had leaking issues so now do the other. This picture is infact a retro-fix, everything after the topstitched seam behind the back bar is new. With new snaps added to the arch.

I think snaps+awning rail is overkill and silly. Lots of times the snaps 'pull up the slack' if the awning rail is installed badly (ie wanders drunkenly) or if the arch is crooked. Is awning rail just 'prestige'? Is it just a gutter preventing blow back? Why both?

Okay, still with me? Now inside;


Is it just me or does that look crappy? I like pie crust, just not in my boat tops.

How fix?

*edit* I just realized re-reading this that you can see what we used to do in the first pic. How the side window attaches. Thats what I'm talking about.
44
General Discussion / 2 Weeks Off!
August 21, 2010, 07:19:45 am
Woo Hoo! After 50+hr weeks and Saturdays since May, it shuts off like a tap. Two weeks vacation. Then back to winter hours. Ahhh....

Feels good. Heres stuff I finished this week.


We made this guy his flybridge enclosure and a back curtain for his rear section earlier. His wife hated it (the back curtain) So he had us enclose the rear. Too Much Money.


Bimini


Funkiest bimini ever. A customer of great vision.


Log 'cabin' enclosure


My own travel cover on my new(ish) boat.


dodger


Inventory, incase McDonalds needs playgrounds when we're closed.


Then to keep the cops happy, an emergency rush enclosure. It was delivered wednesday at 3:30 and finished Friday at 2:30. Believe it or not the first T top enclosure I've ever made.

Well, so long Peppy! Devin's going boating!


45
General Discussion / Busy Week!
July 23, 2010, 06:25:44 pm
Well, more like 11 days. But to start off with this on a monday morning! Snap to it!


So first it was a


Then we had a


and one of these

(a la Mike with the run it down the window)

Phew! Wadda week *eleven days*! Just whip out one of these


and thats me off to the beer store.
46
I think there was like, ten seams in this entire interior, not counting welts. Only 3 in this heap,


And taking it apart! They assemble these things when the boat is uncapped. Meaning the top half is upside down on the table and they screw all the upholstery in then put it together with the bottom half. I tried to get the owner to let me pry the 2 halfs apart but he wouldn't go for it. I had to grow new elbows. (I have 5 so far)


The green arm on the right gets a bolt into a Tnut in the upholstery. Access is that cup holder you see. What fun. 

Truthfully most of the credit for this goes to Allsport vinyl. The stuff is nutzo.
47
General Discussion / 'Pushing' Zipper Flaps
June 09, 2010, 06:13:26 pm
We were having problems with our zipper flaps a bit ago. It took me a lot of thinking to figure out what we were doing wrong. I wonder if anyone else does this, has similar problems, or has another fix....

When we sewed a zipper flap we laid the flap flat on the main top and sewed the zipper to the top. We did this (almost) always on every flap. I tried to mark my lines on the pattern where they would lay on the finished top. Since we always laid the flap flat, sometimes you couldn't do this. A flat flap will lay the seam on the middle of the bar. (on 1" tube the seam will be 1/2" down from the top of the bar) On the back bar of the front section of a camperback the cloth usually only touches the top of the bar then carries on to the camper section. If you lay that flap flat it'll suck down 1/2", changing the shape of the curve of the rain flap leading to wrinkles/sucking in/general ugliness. Some times we would 'push' flaps. Lay the flap flat, then push it back towards the seam and sew it. We had no rhyme or reason to this and only pushed it 1/4". We had no science.

I introduce to you, The Push Gauge! (also know as the Peppy)


The ruler touches the top of the leading bar and the hook hooks on the bar needing the flap.


I have it marked in 1/8" but only ever mark 1/4". I use it to make ticks then join the ticks with the ruler. Here I'm marking 1/2" push.


It seems to me that the optimum place to mark the seam is the last point that the ruler lays flat on the pattern without going over the edge. Seems the rain flap lays better when marked like this. What do you guys/gals think/do?

I then mark the push on the pattern, in this case 1/2". The sewer then lays the flap flat, then subtracts 1/2" and sews it down. (actually she now measures from the seam but same difference.)

This is only for marking seams with a flap. I almost never lay a flap flat anymore. My tops fit nicer than they ever did before in front and behind the bar. I felt like a real dummy making tops for so long without giving flaps a second thought. Oh well, hope it'll help someone else if your not doing something like this already. If anybody's interested I'll detail how I made it.


This is what I was making. A flybridge bimini, enclosure pattern to follow. If it ever stops raining. (I kinda hope it doesn't. I hate flybridges. Pinstripes don't make good scaffolding.)
48
General Discussion / The customer is always right?
June 04, 2010, 05:15:20 pm
Yah, yellow and black looks pretty cool, and maybe a camperback attached to a camperback is a great idea.....


...but his boat is red, right?

(next year he'll want to enclose the swimplatform I just know it.)
49
Heres a rebuild I finished. Was so rotten I didn't take the floor out, I swept it up.
before:


During:


New floor pattern:


Oops! just realized I don't have any done pictures uploaded yet. Don't feel like doing it now. Stay tuned!