Need Help? Call Us 415-423-3313
  • Welcome to The Upholster.com Forum. Please login or sign up.
 
May 16, 2024, 06:55:14 pm

News:

Welcome to our new upholstery forum with an updated theme and improved functionality. We welcome your comments and questions to our forum! Visit our main website, Upholster.com, for our extensive supply of upholstery products, instructional information and videos, and much more.


Show posts

This section allows you to view all posts made by this member. Note that you can only see posts made in areas you currently have access to.

Topics - NDAV8R

1
General Discussion / Lear Jet Air Ambulance Projects
November 22, 2018, 09:11:37 pm
Hey Gang!   Well, it's been awhile since I posted anything since I have been pretty busy this last year. We took on a 5 airplane Lear Jet Air Ambulance conversion projects for one client to serve the State of Alaska. Between 4 of us (2 aviation mechanics, avionics tech and myself) we gutted the Lear 45s and installed a twin gurney configuration. 
Here is how it started...
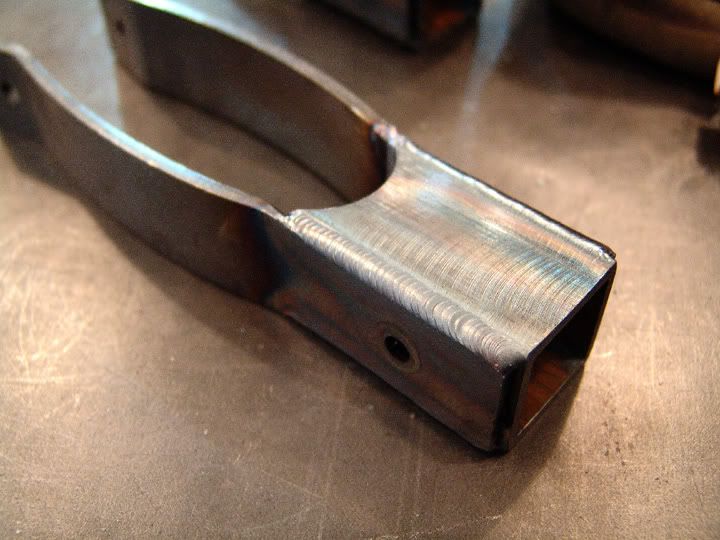
I had to Fabricate and TIG weld a rear rack or shelf for medical equipment for all 5 jets. The prototype had to sustain a 7G weight load test (over 2000lbs) and become certified before they could go in.

Each Lear45 had to be rewired, plumbed, for vacuum, air, oxygen for all the medical equipment thru out the planes.

Here is how they turned out...

Now that the word is out that we have been doing this for awhile, we just started a Beechcraft KingAir 200 and a Pilatus PC-12.
  It is a real "test" for me since I had a "total" Knee replacement in August...just out for the surgery and a little rehab and I am back on the knees pad again...great.  I thought I would have time to complete my leather interior on my own Cessna 172M, but not yet. I will post that when I get done with that.
Bye for now,
Gale (NDAV8R)


2
Here is a little (I thought) project I took on in July for a buddy of mine. It is a 1929 Marmon Model 68 Roadster. This was my first attempt in sewing and installing a roadster top.
Here it is in my friend's barn. It is in original condition with a few repairs or touch ups, but the top was redone in the 50s or 60s...

Marking off before tearing it apart...

Had to remove a billion tacks...

Had to repair the oak bows...

Setting up and sewing the bow pads...

Bows recovered and Pads installed...

Fitting the rear window panel using Stainless Steel staples. When I talked to the President of the Marmon Auto club about installing period correct fasteners, he thought that this was the only 1929 Model 68 Roadster in existance...

Since the old pieces were so rotten, and the high cost of the new top material, I patterned on some trial canvas material first...

Stretching and Stapling the front down...

Laying out for the back trim piece...

CONTINUED ON NEXT POST (PART TWO) http://www.upholster.com/upholstery-forum/index.php?topic=14195.msg115940#msg115940

3
Completed...from Part 1 http://www.upholster.com/upholstery-forum/index.php?topic=14196.0


Outside my shop...


Interior photo...

Rear seat for the Mother-in-law, and the trunk was a trunk...

The engine is a straight 8 but other Marmons came out with a straight 6 and the limos came with a V16....


Me, standing in front of this rare car. The Marmon Motor company built cars from 1903 to 1933 and like 2000 other small car companies, they succumbed to the great depression....


4
Hey there gang: Well, its been a while since I posted anything here. I have been busy doing welding, machining and a lot of small upholstery projects for the Fargo Jet Center. (where I work)   The latest big project was to convert a brand new 8 million dollar aircraft into a flying ambulance. It has been a 6 month long project including sending the plane to get new paint. The customer is the Mayo Clinic out of Rochester, MN. This is the first time a 350 KingAir have been converted.
Here is the front cockpit, IPOD pouches were installed on lower side panels...

Rear cabin shots looking forward...

Overhead instruments and rail system installed with the one off custom mounts I fabricated and were polished...

Aft section with some cabinetry...

LED lights were installed in the headliner, all seats were recovered, headrests were Embroidered with Mayo's logo, Loncoin flooring was installed, new fabrication stainless steel side walls were installed, all new USB, and com jacks were installed throughout the cabin.

Folding table recovered with customer communication jacks installed.

Here is the plane inside our shop...

And outside one of our hangers...

Our first Air Ambulance project a couple of years ago, involved just 2 other guys and myself. This complex-ed project involved myself and over a dozen other aviation techs.
5
I just read a thread posted by byhammerandhand about real old world craftsmen. good post.

It reminded me of one I had found and saved. This link posted on Vimeo that is always updating. It has 70 pages (about 5 stories to a page) of today's craftsmen. Something each one of us can relate.

WARNING: THIS LINK WILL TAKE HOURS FROM YOUR LIFE, SO BE PREPARED. I still go back to check any additions.


https://vimeo.com/channels/thosewhomake

Ndav8r
6
General Discussion / Juki learning curve update
April 01, 2015, 06:01:41 pm
You Guys are Great!
Thanks for all the input so far...KEEP THEM COMING!
Here are some new baby pictures which some have requested. (Click on thumbs, then click on Photobucket's magnifying glass to see full image)Here is the overall pic of the machine and stand which I mounted on swivel locking casters.
They way I can move it around my shop and tables to my choosing. when I'm done it can get tucked back in.


Here is the extra clearance from what my Consews had...it was the main reason I bought this because of the large aviation
panels and carpet pieces I have to jam inside.


Here is Walking foot clearance using the knee lift. A Massive 20mm or in this case a dime on a quarter!


And the bobbin size is a lot larger, 1 1/8" compared to 1" and are a little wider.


Now I guess I am committed to many more years of torture, so you guys will have to put up with me.  :)
7
Hey there Gang!
    Been saving for a very, very long time now and made a purchase of a new Juki Lu2810 sewing machine that was introduced last summer. With my large Aviation Panels and carpet pieces this one fit the bill. It has a 14" throat and can produce a 9MM stitch.  The extra 4 inches lateral and 1" vertical spacing, compared to my Consews are well worth the money!!
    It is a vertical axes bobbin machine where the bobbin lays flat. And the bobbins are huge!!
Now the down side...I have had more than a few thread jams on start up...ugh!  My question is this for the people who have ran flat bobbin machines... do I have to hold down  the needle thread, or bobbin thread or both threads on startup?  I talked to a Juki Tech over the phone and he said all I have to do is lay both threads under the feet towards the back without holding by hand. I have the bobbin installed correctly (when I pull the bobbin thread-the bobbin spins counterclockwise) and threaded through the bobbin tension spring ok. It only jams or snarls on the couple of thread pokes. A couple of people that have ran those types of machines says you get use to holding them.  Need a little input here. Any tips or advice?
Many Thanks,
Gale. (Ndav8r)
8
Hey there gang: Weird situation I got here...
    Some of you know I work at an Aircraft Repair Facility as aviation upholsterer, machinist, and Tig welder. Anyway last Thanksgiving, an out of company cleanup and detail outfit was trying to get some stains off of an emergency door panel on a Cessna Citation (Cessna's version of a Learjet). Instead of trying the cleaner on an inconspicuous place, they just "dove" in and attacked the stains right on the door. As you guessed it, they pulled the colors right out of the cloth material.
   The jet is about 12 years old and it is virtually impossible to get matched material, but as of late tracking down the actual blueprints and bill of materials, we did come up with some samples. One of the samples is a dead ringer except the colors are a bit too strong. I am thinking the original material has been slightly light faded.  I have only 2 options...(1) remove all the interior to get to the upper window panels with the emergency door panel, strip and recover first with 1/16" foam, then all new material 18 feet long or (2) Try to lightly bleach out the one square yard of material needed to recover just the Emer. door.
 Your talking close to 6 or 7 thousand for option #1 vs. about $300 for #2.

 So my question is this...has anyone messed around with bleaching at all??? I am thinking to try small pieces of the materials in different bleach baths until I get it hopefully get it right.
Any input out there?
Here is a Cessna Citation interior, but not the one I am going to work on...

Thanks!
NDAV8R
9
General Discussion / March ends like a LION!
March 31, 2014, 08:45:08 pm
    Well here in North Dakota we are in the middle of our 11th Blizzard of the winter season. All of our snow had just melted, only to start all over again with not just a little of snow...we had close to 12 inches of that wet crap and it started at 11:00 am this morning.  Just to the NE of us, they are estimating over 20 inches of it.
  The 50+ MPH winds started Saturday night and still blowing Hard! Zero visibility most of the day...major interstate highways are still closed. It is suppose to quit Tuesday Night.   Hope no one is stranded and ventures out on their own...we do on occasion lose a couple(die).
    They say us people up north here are tough (maybe stupid) but it does harden the mind! Many people come and then move away after their first winter here. Out in the western part (Oil Fields) of ND in December-January, when temps dropped to close to -40*F (below zero), with the addition of 30MPH winds, people were quitting at a rate of 30 an hour!
  All the Highway and street departments in every city are stressed beyond all their resources, due to the long winter.
I know I won't be sewing first thing in the morning cause I'll be snow blowing my 5 foot drift out of the driveway.
  There are worst places to live in the world, but right now I can't think of any.

Gale.
10
Hey Gang:
A friend of mine just a picked a 1932 V12 Cadillac Sedan with 38,000 miles on it, purchased from a museum.
    It is in dire need of restoration, including the top and interior. He says this could be a 3 to 4 year restoration project.
            It appears to be all light grey wool seats side panels and headliner. The lower kick panels on the back side of the front seats are mohair. It also has some horse hair in the seats...eww! I probably won't replace that, unless he restores to original, which I have serious doubts.
My question is: where is a good source for vintage materials including the exterior top material? When and if I take this on...I will post photos.
  Thanks,
Gale.
11
Hi Gang!
Finally got done with this very long project...too tired to type...pictures can tell the story...
Gale. PS...I hate Photobucket!!!


12
General Discussion / Lastest Airplane Project
December 17, 2012, 06:34:34 am
Hi Gang! Here are some pics of my latest airplane project, a Piper Arrow...

Complete Interior Project which included all leather on seats and side panels that matched exterior paint job.


This was a UND AeroSpace trainer airplane...EEWW!

Don't you just love the front seat covers let alone the orignal seats!!

All new headliner and all window trim wrapped with Ultra leather, new carpet. All new headrests fabricated from scratch.

New carpet and floor insulation installed as well as pleated heel pads.


New headliner made with Ultra leather and overhead council repainted.

All new aluminum side panel backing was custom patterned and fabricated to fit the airplane.
New leather windlace,too.
Side panels have all hidden stitches on pleats. .

All seats frames were stripped down, cracks repaired and repainted. All new multi layered, multi density foam on all seats. All seams were double stitched.

All Pleats have hidden stitches to prevent future failures. Leather cording has a skived color change with no noticeable physical seam. French stitching is with #270 thread (#25 needle).

This was a project from Hell since it was my worst "before" shape airplane ever! I have worked late into the nights trying to get it done in a time frame of a normal interior. It was far from normal! And the customer could'nt understand of all the problems came up and was really bent out of shape when I ran a little over a week beyond the time frame. Did'nt even get a simple thanks or comment for the job from him! :(
Oh well, thats water under the bridge and this interior job has brought more business from people who have seen it, though. ;)
Gale Hansen.
13
General Discussion / Garage Door Screens
May 22, 2011, 07:52:53 am
Hi Gang: 
   As Summer finally approaches in the Dakotas, there are times when I open up my shop overhead doors and get fresh air.  But up here were are plaqued with mesquitoes that can carry you away and make a margarita out of you. And now we are getting more cases of West Niles from the damn things.  I do have AC in the shop, but still like a breeze every now and then.
  I have seen some kits on the web.  Have any of you have or made any such of a door screen? I have two doors that are 10x8'.  Any input?

Thanks,
NDAV8R
14
General Discussion / High Heat Resistant Material
May 10, 2011, 08:21:59 pm
Hi Gang.
Lately between my upholstery projects, I have be the "Choosen One" for all our Welding projects at the Airport where I work. I have been doing alot of TIG welding on Chrome Moly, Stainless Steel, Aluminum, and such. (Everything goes to get Tested, and Certified for the Feds, of course).
 When I am in the middle of running a very hot welding bead, I am constantly looking for a break from the intense heat.  Does anyone know of a High Temp Resistant material like kevlar or the likes of, that I can sew up for a welding sheilding glove or mit? I have seen the TIGFinger online, but I need more coverage. I don't need a lot of dextarity on the torch hand like I do on the other. I don't really need a pair of gloves, so I guess I can make one.
 I guess the next question would be the choice of thread, too. I have sewn up a seal on our local meat locker's smoker in the past, but no one knows the material.
Any Leads?

 Here is a Chrome Moly part that I welded up which holds a spray boom onto one of our King Airs.


Thanks.
NDAV8R
15
Hey there gang:
 I am faced with a job of recovering a Honda GoldWing (King/Qween) seat. It had vinyl with a sheet of plastic underneath it from the factory. And most of the insert seams were heat bonded together. The owner diffenitely wants black leather in it's place.
  Have any of you covered motorcycle seats with top grain leather(I assume the best type of leather)?  It is possible to replace the insert seams with a few recessed buttons like some Harley seats I have seen. Any Ideas???  What can I use to treat for an occational rain shower... Seam Sealer and under plastic? I have searched some of the old posts, but still need some input.

Any ideas?

Gale.
16
General Discussion / Bounty for the Ground Hog!!
March 23, 2011, 09:08:32 am
Its a good thing that the Ground Hog can't survive in North Dakota....He would get shot!
As you remember, he promised us an early Spring....ya right!  We just got Dumped on by a very heavy wet snow.
 Reports up to 19.5" or better around here.  So wet the snowblowers have a hard time blowing.  The Interstate Highways are still shut down.  Some of the Highway and Street Depts had already took off their plows prior to this.   We thought we were out of the woods for spring flooding, but now I'm sure this will definitely change things. Fargo ND had just completed 3 Million sandbags filled, but they will probably need more.This reinforces that we have only two seasons up here...Winter and Winter! :o :o


Gale.
17
Hey gang:
I recently picked up a Consew 226 with reverse.  It had not been used for awhile, so I started to clean and adjust it in my spare time. It has a severe problem of under fabric thread looping going on. I am slowly finding little problems, like a nick in the rotating hook which I polished smooth. New needle, working on the timing.   
   I found several different bobbins in the 226 drawer, however there were 3 different sizes. Does anyone know the exact dimensions, Diameter and width, for the right bobbin for the 226? Also some resources say I should use a felt pad or spring under the bobbin for anti backspin?  I understand the bobbin is to be dropped in with the thread to be wound in a CCW direction, looking from the top?  I do own two 206RBs which has a larger bobbin, which I knew before this purchase.
One day at a Time
Gale.

18
General Discussion / Expensive Anti-roll device tip
January 05, 2011, 10:42:32 am
A couple of years ago, I gave a tip (of many) to one of our community members and said I will post it. Well, I finally got around to it.
 Ever wish that pencil or chalk would stop rolling off the table and resulting having to sharpen it or get a new one?  Sometimes if you keep it simple, things just work out. Here as seen in the photo, I have wrapped my marking tools with a (very, very expensive) tape.
 Who knows, this could save you 20 minutes off your life! ;D
Gale Hansen